
Safety Precautions and Instructions
Always read and follow the manual carefully to ensure safe and effective use of the DieHard battery charger. Avoid sparks, keep the area ventilated, and prevent overcharging. Use proper connectors to maintain correct polarity, protecting both the charger and battery. Save these instructions for future reference to ensure optimal performance and safety.
1.1 Essential Safety Rules for Using the DieHard Battery Charger
Read the manual thoroughly before use to ensure safe operation. Avoid sparks near batteries, as they may ignite hydrogen gas. Keep the charger away from flammable materials and ensure good ventilation. Connect the charger correctly, following polarity guidelines to prevent damage or short circuits. Never overcharge the battery, as it can cause overheating or explosion. Always unplug the charger when not in use and store it securely. Follow these rules to protect yourself, the charger, and the battery from potential hazards.
1.2 Precautions to Avoid Battery Damage or Charger Malfunction
Ensure the charger is set to the correct voltage for your battery type to prevent overcharging or undercharging. Avoid reverse polarity, as it can damage both the charger and battery. Do not leave the battery unattended while charging, as overcharging can cause overheating or damage. Store the charger in a cool, dry place away from direct sunlight. Use only genuine DieHard accessories to maintain compatibility and prevent malfunctions. Regularly inspect cables and connections for wear or damage to ensure safe and efficient charging.
The DieHard battery charger is a microprocessor-controlled, fully automatic device designed for 12V lead-acid batteries. It also functions as an engine starter, ensuring efficient charging and maintenance.
Understanding the DieHard Battery Charger
2.1 Overview of the Charger’s Features and Components
The DieHard battery charger features automatic operation, overcharge protection, and a built-in battery and alternator tester. It includes a microprocessor for precise charging, LEDs for status indication, and durable construction for long-term reliability. The charger is designed for 12V lead-acid batteries and includes safety features like spark protection and thermal monitoring. Its compact design allows for easy use in various automotive applications.
2.2 Compatible Battery Types and Vehicles
The DieHard battery charger is designed for 12-volt lead-acid batteries, including standard, deep cycle, and AGM types. It is compatible with most automotive, truck, and marine vehicles, as well as RVs and lawn tractors. The charger ensures safe and efficient charging for a wide range of applications, making it versatile for various vehicle needs and battery maintenance requirements.

Installation and Initial Setup
Read and follow the manual carefully for proper installation. Connect the charger as instructed, ensuring a well-ventilated area. Save these instructions for future reference and safe operation.
3.1 Step-by-Step Guide to Connecting the Charger
First, locate a suitable workspace with adequate ventilation; Ensure the charger is turned off before connecting any cables. Attach the positive (red) clamp to the battery’s positive terminal, then the negative (black) clamp to the negative terminal or a grounded metal surface. Plug in the charger and select the appropriate mode. Always refer to the manual for specific details and safety guidelines to ensure proper connection and operation.
3.2 Initial Charging and Calibration Process
Plug in the charger and ensure all safety precautions are followed. Select the correct charging mode based on the battery type. Allow the charger to complete the initial charging cycle fully. Once complete, disconnect the charger from the battery and test the battery’s voltage. Proper calibration ensures optimal performance and longevity. Always follow the manual’s specific instructions for your DieHard model to achieve the best results.
Operating Modes and Charging Options
The DieHard charger offers automatic and manual modes, allowing users to customize charging based on battery type and needs. Select modes with the control panel for optimal results.
4.1 Explanation of Automatic and Manual Charging Modes
The DieHard charger features automatic mode, which adjusts charge settings based on battery type and condition, preventing overcharging. Manual mode allows advanced users to set specific voltage and current levels for precise control over the charging process, ideal for specialized batteries. Both modes ensure safe and efficient charging, with the charger automatically switching to maintain mode once the battery is fully charged to prevent damage. This dual-mode functionality provides versatility for various user needs and battery types, ensuring optimal performance and longevity of the battery.
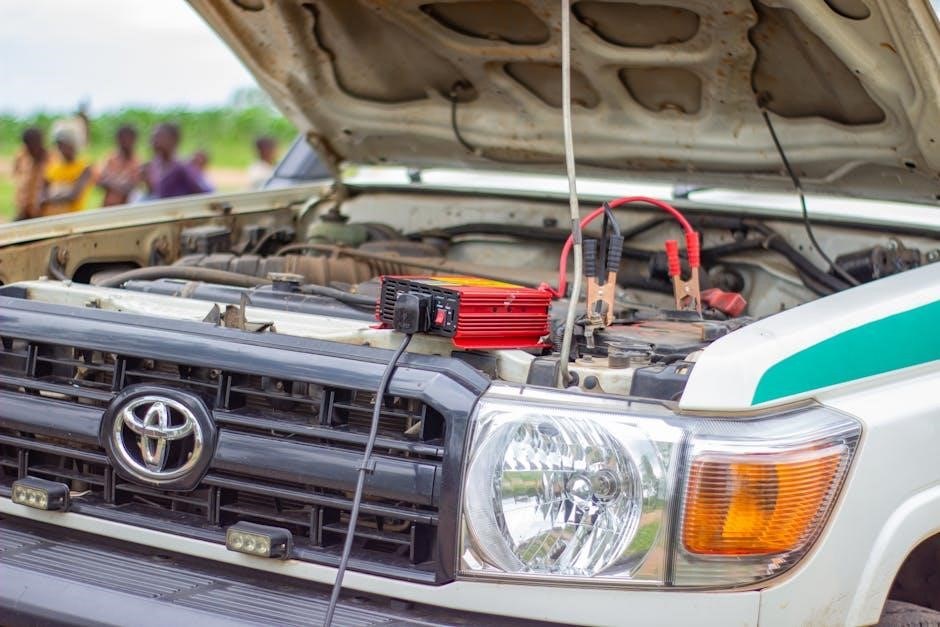
4.2 Using the Charger as an Engine Starter
The DieHard battery charger doubles as a powerful engine starter, providing a high current burst to ignite engines. To use this feature, switch the charger to engine start mode, typically via a dedicated button or setting. Attach the provided clips to the vehicle’s battery terminals, ensuring correct polarity (red to positive, black to negative). Ensure the charger is fully charged and compatible with your vehicle’s battery type. Always follow the manual’s guidelines to avoid electrical hazards and ensure safe, effective engine starting. After use, recharge the charger to maintain its readiness for future needs. This feature eliminates the need for jumper cables, offering convenience and reliability in emergencies. Proper use extends the charger’s lifespan and ensures reliable performance. Always adhere to safety precautions to prevent damage or injury. The charger’s engine starter mode is designed for quick, efficient starts, making it an essential tool for car owners. By following the manual’s instructions, you can confidently use the DieHard charger to start your engine and get back on the road swiftly.

Maintenance and Care
Regularly clean the charger’s terminals and inspect cables for damage. Store the charger in a dry, cool place away from direct sunlight to maintain performance and longevity.
5.1 Regular Maintenance Tasks for the Charger and Battery
Regularly inspect the charger and battery for signs of wear or damage. Clean terminals with a wire brush to ensure good connections. Check battery water levels if applicable and top them off as needed. Store the charger in a cool, dry place, away from direct sunlight, to maintain optimal performance and extend lifespan. Always follow the manufacturer’s guidelines for maintenance to ensure safety and efficiency.
5.2 Storage Recommendations for the Charger
Store the DieHard battery charger in a cool, dry place away from direct sunlight and extreme temperatures. Avoid exposure to humidity or flammable materials. Keep the charger out of reach of children and pets. Ensure the charger is turned off before storage and avoid coiling the cord tightly. Regularly inspect the charger for damage before reuse. Proper storage extends the lifespan and ensures safe operation of the device. Always follow the manufacturer’s guidelines for storage conditions to maintain performance and reliability. Store the charger in its original packaging if available to protect it from dust and potential damage. This will help preserve its functionality and ensure it remains in good working condition for future use. By adhering to these storage recommendations, you can maintain the charger’s efficiency and safety over time. Ensure the storage area is well-ventilated and free from any hazardous materials to prevent accidental damage or malfunction. Always check the charger for any signs of wear or damage before and after storage to ensure optimal performance. This will help prevent any potential issues and ensure the charger operates effectively when needed. Proper storage is essential for maintaining the charger’s reliability and longevity, so make sure to follow these guidelines carefully.
Troubleshooting Common Issues
Check for loose connections, damaged cables, or incorrect polarity. Ensure the charger is properly plugged in and the battery is compatible. Refer to the manual for resolving error lights or charging issues promptly to avoid further complications and ensure safe operation.
6.1 Identifying and Resolving Charger Malfunctions
Check for loose connections, damaged cables, or incorrect polarity. Ensure the charger is properly plugged in and the battery is compatible. If error lights appear, consult the troubleshooting guide in the manual. Avoid overcharging, as it may damage the battery. If issues persist, disconnect the charger and contact DieHard customer support for assistance. Regular maintenance can prevent malfunctions and ensure optimal performance.
6.2 Common Battery Charging Problems and Solutions
Common issues include overcharging, slow charging, or no charge. Check connections for tightness and inspect for damage. Ensure correct voltage and battery type settings. If the charger shows an error, refer to the manual’s troubleshooting guide. Avoid extreme temperatures and always monitor charging progress. For persistent issues, reset the charger or consult customer support. Proper maintenance can prevent many charging problems.
Warranty and Support Information
The DieHard battery charger is backed by a three-year full warranty covering defects. For support, contact customer service via phone or email as detailed in the manual.
7.1 DieHard Warranty Coverage and Terms
The DieHard battery charger is covered by a three-year full warranty. This warranty applies when the product is operated and maintained according to the supplied instructions. If the DieHard product fails due to a defect, it will be repaired or replaced free of charge during the warranty period. For full details, refer to the warranty section in the owner’s manual or contact customer support.
7.2 Contacting Customer Support for Assistance
For any inquiries or issues, contact DieHard customer support. Visit the official website for contact details or refer to the owner’s manual. Support is available to assist with warranty claims, troubleshooting, or general product questions. Ensure to provide your product model number and a detailed description of the issue for efficient service. This service is designed to help you maximize the use of your DieHard battery charger effectively.
Additional Resources
Additional resources, including the owner’s manual and online guides, provide comprehensive support. Explore recommended tools and accessories for optimal battery charger maintenance and performance.
8.1 Where to Find the Full Owner’s Manual Online
The full owner’s manual for the DieHard battery charger can be found online at Manualzilla. This resource provides free PDF downloads for various models, including the DieHard 28.71219 and 200.71315. Users can easily browse and download the manual, ensuring they have access to essential information for safe and effective use. Downloading the manual is quick and guarantees access to the latest guidelines for your specific charger model.
8.2 Recommended Tools and Accessories for Battery Maintenance
For effective battery maintenance, use a multimeter to check voltage levels, and a cable cleaner for terminal cleaning. A hydrometer is essential for checking fluid levels in non-sealed batteries. Terminal protectors prevent corrosion, while insulation tape ensures secure connections. These tools help maintain optimal battery performance and extend its lifespan. Always refer to the manual for specific recommendations tailored to your DieHard battery charger model.
Frequently Asked Questions (FAQs)
Common questions include charging times, error light meanings, and compatible battery types. Refer to the manual for detailed solutions to these and other frequently asked questions.
9.1 Common Questions About Charger Operation and Safety
Why does the charger beep during operation? This indicates a potential issue like incorrect polarity or a faulty battery. Can I leave the battery charging overnight? Yes, but ensure the charger is set to maintenance mode to prevent overcharging. Why are there error lights? Consult the manual for specific error codes and solutions. Always follow safety guidelines to avoid accidents and ensure proper charger functionality. Regularly check connections and avoid sparking to maintain safety.
9.2 Troubleshooting FAQs for Battery Charging Issues
Why isn’t my battery charging? Ensure all connections are secure and correct. Check the charger’s power source and battery terminals for corrosion. What if the charger won’t turn on? Verify the outlet is functioning and the charger is properly plugged in. Why is charging slow? It may be in maintenance mode or the battery capacity is low. Consult the manual for detailed troubleshooting steps and solutions to resolve common charging issues effectively.
Always prioritize safety and follow guidelines for optimal performance. Refer to the manual for best results and maintenance tips, ensuring your DieHard charger functions effectively and reliably.
10.1 Final Tips for Safe and Effective Use of the DieHard Battery Charger
For safe and effective use, always adhere to the manual’s guidelines. Ensure the area is well-ventilated and avoid sparks to prevent ignition risks. Regularly inspect cables and connections for damage. Maintain the battery’s health by monitoring charge levels and avoiding overcharging. Store the charger in a cool, dry place when not in use to prolong its lifespan. Following these tips ensures reliable performance and longevity of your DieHard battery charger.
10.2 Importance of Following the Owner’s Manual Guidelines
Adhering to the owner’s manual ensures safe and efficient operation of the DieHard battery charger. Proper guidelines prevent accidents, protect the charger and battery, and optimize performance. Following instructions helps avoid overcharging and maintains the device’s longevity. Regular maintenance and troubleshooting steps outlined in the manual ensure reliability. Always refer to the manual for specific safety precautions and operational tips to maximize the charger’s effectiveness and extend its service life while ensuring user safety.